
Everything I thought I knew about tripod shooting went out the window the moment I touched a 500mm lens.
The Setup
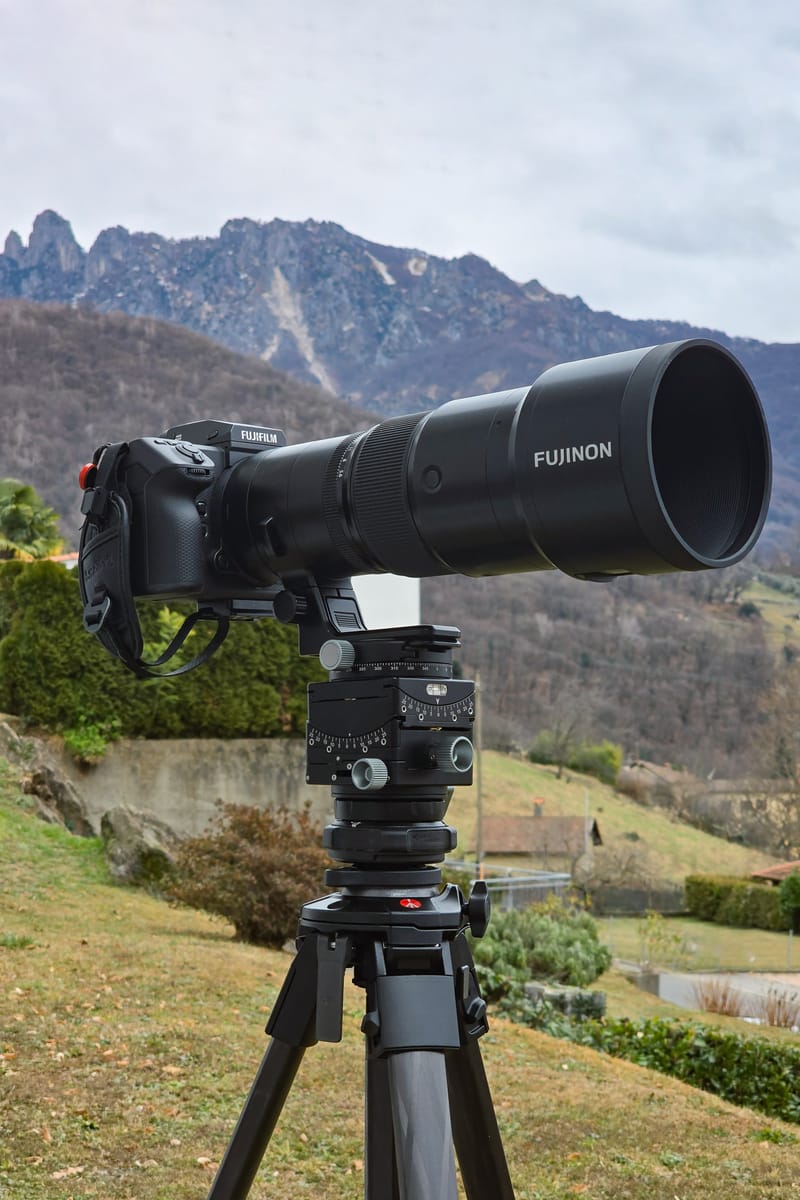
I've been shooting medium format for a while now. I know my way around a tripod. I understand the exposure triangle. I've read the discussions about IBIS and when to disable it. So when I mounted my GF 500mm f/5.6 to my GFX 100 II and pointed it at the Denti della Vecchia from my front lawn, I figured I had this covered.
The shot looked fine on the back of the camera. It wasn't until I pulled the files into Lightroom and punched in to 100% that my stomach dropped. The image was soft. Not "needs a touch of sharpening" soft - blurry. Motion blur, specifically. On a tripod... with a 2-second self-timer, and OIS turned on.

What followed was a deep dive into the physics of super-telephoto landscape photography, a crash course from dozens of experienced shooters, and ultimately, a complete rethinking of how I approach long-lens work on a tripod.
Here's everything I learned.
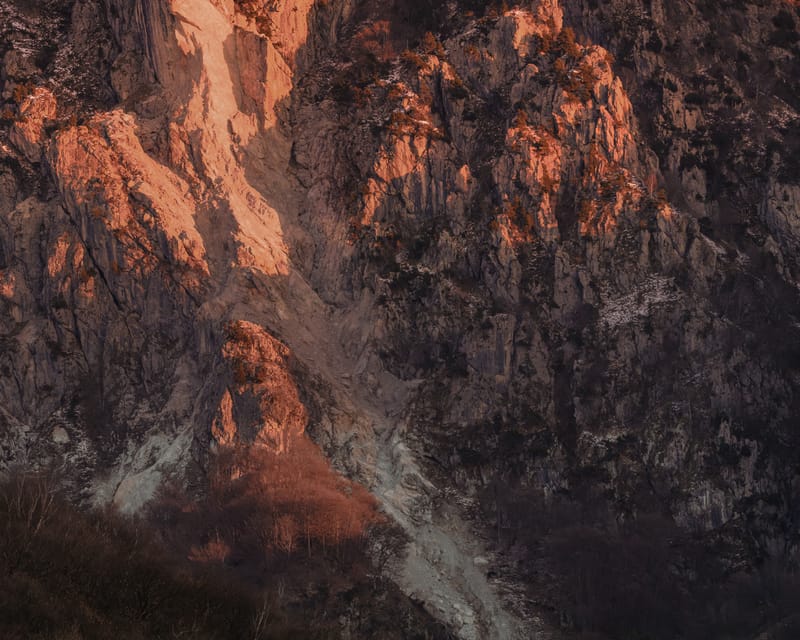
The Problem: A 100% Crop That Told the Whole Story

The initial shot parameters:
- Camera: Fujifilm GFX 100 II
- Lens: Fujifilm GF 500mm f/5.6 R LM OIS WR
- Aperture: f/8
- Shutter Speed: 0.8 seconds
- ISO: 100
- Tripod: Manfrotto ONE Carbon Fiber
- Head: Leofoto G6
- Self-Timer: 2 seconds
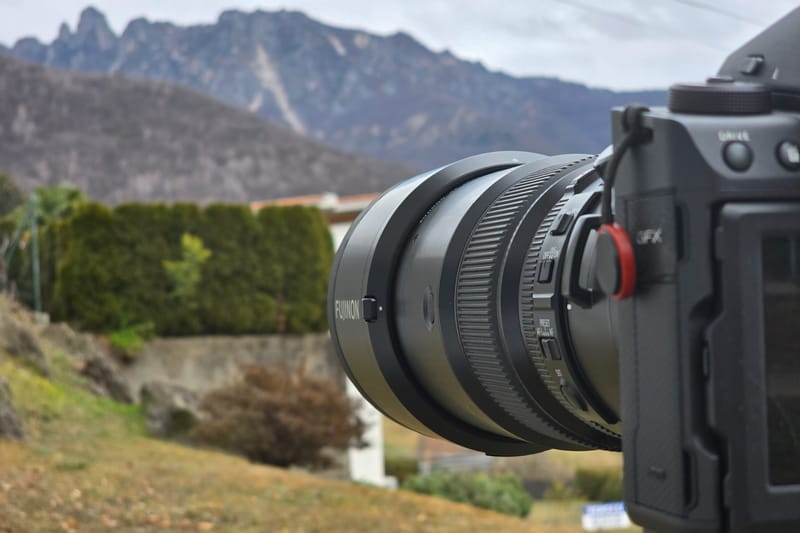
- IBIS/OIS: On (mistake #1)
- Shutter Type: Mechanical (mistake #2)
- Lens Hood: On (mistake #3... maybe)
On paper, this should work. Tripod-mounted, long exposure for low ISO and maximum dynamic range, self-timer to eliminate button-press vibration. This is textbook landscape photography technique, but at 500mm, the textbook is wrong.
The Community Weighs In: A Flood of Possibilities
When I posted the 100% crop to a Fuji GFX users group asking what could be causing the blur, the responses came fast. The possibilities fell into several categories:
1. IBIS on a Tripod
Multiple photographers immediately called me out the IBIS. And yes - I had left it on. Stupid mistake, I know.
Fujifilm's own manual explicitly states not to use IBIS or OIS on a tripod. The stabilization system is designed to counteract handheld movement. When the camera is locked down on a tripod, IBIS has nothing to correct for, but it's still making micro-adjustments. Those adjustments, at 500mm, translate to blur.
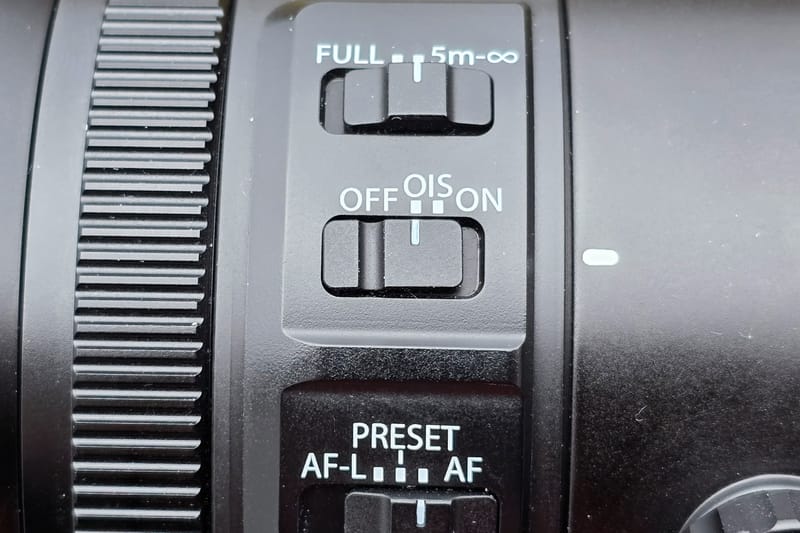
On the GFX system with OIS-equipped lenses, the lens switch controls both OIS and IBIS. When you turn off OIS on the lens, IBIS is also disabled.
2. Mechanical Shutter Vibration (Shutter Shock)
This one was new to me - or at least, I'd underestimated its impact at extreme focal lengths.
The mechanical shutter in the GFX 100 II, like all focal plane shutters, creates vibration when it fires. The shutter curtains accelerate and decelerate rapidly, and that physical movement transfers through the camera body. On a shorter lens or at faster shutter speeds, this is negligible. At 500mm and 0.8 seconds? It's catastrophic.
Several commenters pointed out that even with a 2-second timer eliminating button-press shake, the shutter actuation itself was introducing blur. The vibration doesn't just happen and stop - it can resonate through the system for a surprisingly long time, especially with a heavy lens creating leverage on the mount.
One commenter put it perfectly: "At 500mm, a fly landing on the lens is enough to move it and mess with detail."
3. Atmospheric Distortion
This was the variable I hadn't fully appreciated. When you're shooting through hundreds or thousands of meters of atmosphere, you're not just capturing light from your subject - you're capturing every thermal irregularity, every pocket of different-density air between you and the mountain.
Think of heat shimmer rising off hot asphalt, except far more subtle. At 500mm, you're compressing miles of atmosphere into your frame. Temperature differentials cause refraction, and that refraction shows up as softness, or at longer exposures, as a smeared, hazy quality. Take a look, I recommend at full screen.
One photographer described it as "the typical blue haze seen on many bright days" - the same phenomenon that makes distant mountains appear progressively lighter and less distinct (aerial perspective). Except when you're trying to resolve fine detail at extreme magnification, that haze becomes blur.
The counterintuitive solution? Faster shutter speeds. Not to freeze camera movement, but to freeze the atmosphere. The air is literally moving and distorting your image in real-time. A long exposure integrates all that distortion into mush. A fast exposure captures one instantaneous slice of that turbulence, preserving apparent sharpness even if individual frames show slight geometric distortion.
4. Temperature Differential and the Lens Hood
This one blew my mind.
I'd taken the camera from my 25°C heated house directly outside into 0°C air, mounted it on the tripod, and started shooting with the lens hood attached.
Several commenters suggested the lens hood itself could be trapping warmer air inside it. That thermal differential - warm air rising, cool air sinking, all of it happening inches from the front element - creates localized atmospheric distortion right at the lens. It's like having a miniature heat shimmer generator attached to your camera.
One commenter linked to an article specifically about this phenomenon. The lens hood, designed to protect against flare and physical damage, can actually degrade image quality in certain thermal conditions.
There's also the wind factor: a large lens hood acts as a sail. Even a light breeze can catch it and create micro-vibrations. At 0.8 seconds, that's plenty of time for wind-induced movement to accumulate. Even micro-wind!
5. Tripod and Head Stability
The Manfrotto ONE Carbon Fiber with a Leofoto G6 head isn't a flimsy setup, but commenters noted that even solid tripods have their limits.
Suggestions included:
- Hanging a weight (camera bag, sandbag) from the center column hook
- Not extending the center column at all for maximum rigidity
- Using the widest leg angle possible
- Using the thickest leg sections only (not extending the thinner lower sections)
- Ensuring the tripod feet are on solid, stable ground
One commenter recommended Gitzo Systematic tripods with no center column at all for this type of work. The center column, even when not extended, introduces a potential point of flex.
6. Other Factors
Additional suggestions included:
- 10-second timer instead of 2-second: More time for vibrations to dampen
- Remote release: Eliminates any possibility of touching the camera
- Manual focus: Prevents the lens from hunting or micro-adjusting during exposure. Focus peak to make sure you've got it
- Remove UV filters: Any additional glass element can reduce sharpness
- Check for autofocus hunting: Even with back-button AF, some cameras will refocus when the shutter is pressed
I noticed during one test with OIS and autofocus turned on, after half-pressing to acquire focus, the image in-camera suddenly shifted right as I fully pressed. Weird.
The Test: Mechanical Shutter vs. Electronic Shutter
Armed with this feedback, I ran controlled tests the next day on a lens test chart. I compared Mechanical Shutter (MS) versus Electronic Shutter (ES).
Test Parameters:
- ISO 100
- f/8
- 2-second exposure
- 2-second self-timer
- IBIS off
- Tripod-mounted
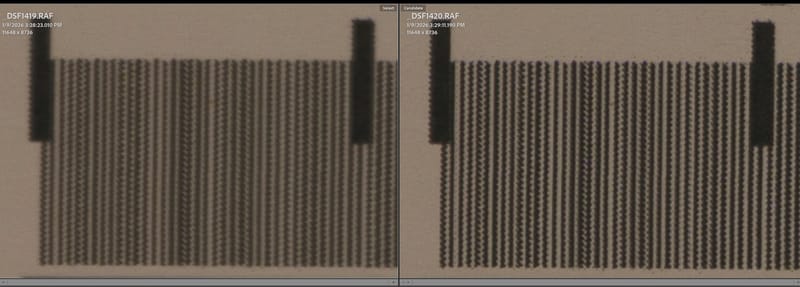

The difference was immediately visible. The mechanical shutter image showed clear motion blur - a characteristic softness with directional smearing. The electronic shutter image was significantly sharper.


I also tested MS with IBIS on versus off, and ES with IBIS on versus off. The result? IBIS made no discernible difference in either case. The dominant variable was the shutter type.
This makes sense when you think about it. IBIS-induced blur and shutter-shock blur might look similar, but their causes are different. In my case, with IBIS off, the mechanical shutter was the primary culprit.
Why Electronic Shutter Works
The electronic shutter has no moving parts. There's no physical curtain accelerating across the sensor. The "shutter" is simply the sensor turning on and off electronically. Zero vibration.
The trade-off, of course, is rolling shutter distortion with moving subjects (the sensor reads out line-by-line, not all at once), and potential banding under certain artificial lights. But for static landscape subjects? Electronic shutter is ideal.
Several commenters also mentioned Electronic First Curtain Shutter (EFCS), which uses an electronic start and mechanical finish. This is actually the default setting on GFX cameras, and it eliminates shutter shock at the beginning of the exposure while avoiding some of the rolling shutter issues of full ES. For my purposes - longer exposures of static subjects - full ES worked fine, but EFCS is a solid middle-ground option.
The Final Settings: What Actually Worked
For my reshoot, I made the following changes:
- Shutter Type: Electronic First Curtain (EF)
- Shutter Speed: 1/500s
- Aperture: f/5.6 (wide open)
- ISO: 6400
- IBIS: Off
- Lens Hood: Removed
- Acclimation: Let the camera/lens sit outside for several minutes before shooting
Wait, ISO 6400? On a Tripod?
Yes. This is where conventional wisdom completely breaks down.
The standard landscape photography approach is: tripod + low ISO + small aperture + long exposure = maximum image quality. That formula works at normal focal lengths. At 500mm, it's a recipe for mush.
Here's the reality:
- Atmospheric distortion requires fast shutter speeds. You need to freeze the turbulence. 1/500s works; 0.8 seconds does not.
- To get 1/500s in low light at f/5.6, you need high ISO. There's no way around this.
- Modern sensor noise at ISO 6400 is manageable. The GFX 100 II's large sensor handles high ISO remarkably well. Lightroom's AI denoise cleans it up without destroying detail. (I quite like the GFX 100 II's noise pattern, reminds me of film and not digital noise.)
- Noise is fixable; motion blur is not. A sharp image with some grain can be cleaned up. A blurry image is garbage.
Some commenters pushed back on this, suggesting I should have used longer exposures and lower ISO since I was on a tripod. My response: Have you actually shot at 500mm without blur using long exposures?
I thought I knew landscape photography. Then I got a 500mm lens, and I learned that "on a tripod" doesn't mean what it means at 24mm.
The Lens Hood Question
I removed the hood for the reshoot, and the images were sharp. Was the hood actually causing problems, or did the other changes (shutter type, shutter speed, acclimation time) do the heavy lifting?
Honestly, I can't say for certain. There was no noticable wind during my original shot, my tests, or the final take. It was likely a combination of factors. Given the potential for thermal effects and wind catch, I now remove the hood for tripod work with this lens unless conditions specifically require it (bright sun causing flare, precipitation, etc.).
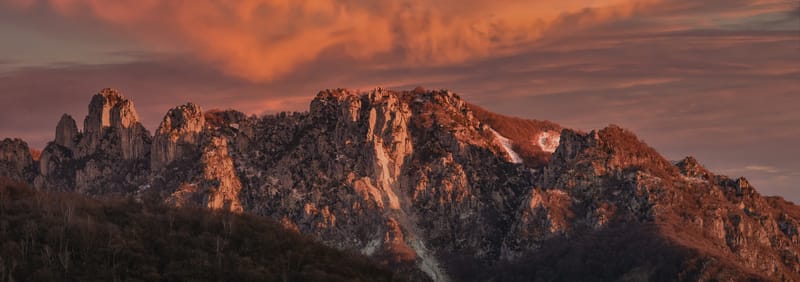
The Panorama Workflow
The final images were shot as a multi-frame panorama - eight vertical frames stitched in Lightroom. A few notes on this:

Shooting a panorama at 500mm gives you an interesting result: you get the compression and rendering characteristics of a 500mm lens, but the field of view is much wider than any single frame.
In my case, eight vertical frames at 500mm resulted in:
- Vertical dimension: Essentially unchanged (~11,648 pixels)
- Horizontal dimension: 40,613 pixels (about 4.65× wider than a single frame)
- Effective horizontal field of view: Approximately equivalent to a 107-108mm lens on GFX
So the final image has the telephoto compression - those mountains look "stacked" and massive, with that distinctive long-lens rendering - but covers a much wider view than any 500mm single frame could capture.
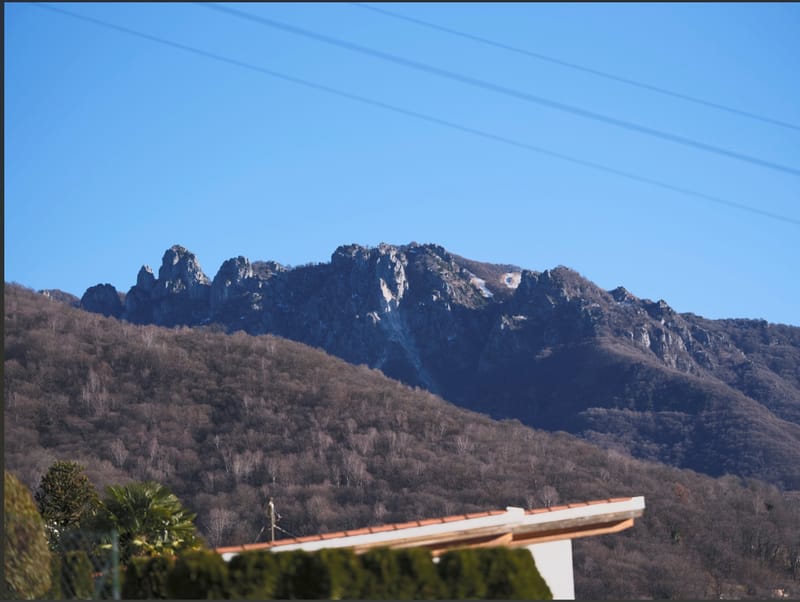
For reference, here's a quick shot of the same subject shot on the Fujifilm GF 110mm f/2 R LM WR LensGF 110mm from the same spot [different day]
Lessons Learned: The 500mm Checklist
For anyone else venturing into super-telephoto landscape work, here's my hard-won checklist:
Before You Shoot
- ✓ Disable IBIS/OIS. On GFX lenses with OIS, use the lens switch. Verify in-camera that stabilization is off.
- ✓ Switch to Electronic Shutter or EFCS. Mechanical shutter will introduce vibration. For static subjects, ES or EF is mandatory.
- ✓ Acclimate your gear. If moving from a warm interior to cold exterior (or vice versa), give the lens and camera time to reach ambient temperature. This reduces thermal distortion at the front element and inside the hood.
- ✓ Consider removing the lens hood. In cold/hot differentials or windy conditions, the hood can hurt more than it helps.
- ✓ Maximize tripod stability. Widest leg angle, thickest leg sections only, no center column extension, weight hanging from the hook if possible. Or get as low as you can with the tripod.
Exposure Settings
- ✓ Prioritize shutter speed over ISO. Atmospheric distortion requires fast shutter speeds to "freeze." ISO 6400 with sharp focus beats ISO 100 with motion blur.
- ✓ Target 1/focal-length minimum as a starting point. At 500mm, that's 1/500s. In turbulent atmospheric conditions (heat, humidity, long distances), you may need even faster.
- ✓ Shoot wide open if needed. Maximum aperture on the GF 500mm (f/5.6) is still sharp. The diffraction penalty at f/11 or f/13 is real; don't stop down unnecessarily if you're fighting for shutter speed.
Technique
- ✓ Use a self-timer or remote release. 2 seconds minimum; 10 seconds for maximum vibration dampening.
- ✓ Focus manually or lock focus before shooting. Prevent any autofocus hunting during exposure.
- ✓ Shoot multiple frames. Atmospheric turbulence varies frame to frame. Taking several shots increases your chances of catching a moment of relative stillness.
Post-Processing
- ✓ Use denoise liberally. High ISO is your friend at 500mm. Modern denoise algorithms (Lightroom, Topaz, DxO) can recover remarkable detail.
- ✓ Apply dehaze carefully. Atmospheric haze reduces contrast and apparent sharpness. Dehaze can help, but don't overdo it.
- ✓ Sharpen for output. Web sharpening especially can restore perceived detail lost to compression.
The View From My Front Lawn
I'm lucky to live where I do. The Swiss Alps are literally visible from my front yard, but it took a frustrating failure - and a lot of generous help from fellow photographers - to actually capture them sharply at 500mm.
The experience fundamentally changed how I think about long-lens work. The rules aren't different; they're just... more extreme. Every small error gets magnified. Every assumption gets tested.
If you're venturing into super-telephoto landscape photography, I hope this saves you some frustration. And if you're still shooting at 0.8 seconds on a tripod thinking the mechanical shutter and ISO 100 are the "quality" settings? Trust me: try 1/500s at ISO 6400 with electronic shutter. Then zoom to 100%.
You might be surprised.
Have questions about shooting with the GF 500mm or super-telephoto technique in general? Drop a comment below or reach out. I'm still learning myself, but happy to share what I've figured out so far.
Technical Appendix: The Physics Behind the Problems
For those who want to go deeper, here's the technical explanation for each issue:
Shutter Shock Mechanics
A focal plane shutter consists of two curtains (or blade groups) that travel across the sensor. The first curtain opens to begin the exposure; the second curtain closes to end it. Each curtain accelerates from rest to high speed, then decelerates. This creates impulse forces that transfer through the shutter mechanism into the camera body.
The magnitude of the vibration depends on shutter speed. At very fast speeds (1/1000s+), the exposure is so brief that the vibration hasn't had time to blur the image significantly. At very slow speeds (several seconds), the vibration occurs only at the start and end, and the majority of the exposure is stable. But at intermediate speeds (roughly 1/60s to 1s), the vibration duration is a significant fraction of the total exposure, causing visible blur.
This is why "shutter shock" is often most visible in a specific range of shutter speeds - it's not a linear problem.
Atmospheric Seeing
Astronomers have dealt with atmospheric distortion for centuries. They call it "seeing." The same physics applies to terrestrial telephoto photography.
Light traveling through the atmosphere passes through regions of varying temperature and pressure. Each region has a slightly different refractive index. The result is that light rays are bent slightly and inconsistently, causing the image to shimmer or blur.
The longer the path through the atmosphere (i.e., the more distant your subject), the worse the effect. And the higher the magnification, the more visible the distortion becomes.
Interestingly, the distortion isn't static - it fluctuates rapidly. This is why short exposures "freeze" sharper images: they capture an instant of the fluctuating distortion rather than integrating it over time.
Professional observatories use adaptive optics to correct for atmospheric seeing in real-time. We don't have that option, but we can mitigate the effect by shooting fast, shooting early in the day before thermal turbulence builds up, and choosing days with stable atmospheric conditions.
IBIS Feedback Loops
Image stabilization systems use gyroscopic sensors to detect camera motion, then move either the lens elements (OIS) or the sensor (IBIS) to compensate. This works beautifully when the camera is actually moving - handheld shooting, walking, shooting from a vehicle.
On a tripod, the camera isn't moving but the stabilization system, however, is still running. It's detecting tiny vibrations (from the environment, from shutter shock, from electronic noise in the sensors) and "correcting" for them. But those corrections themselves create motion, which the system then tries to correct, which creates more motion...
This feedback loop can produce characteristic "jitter" blur that looks like motion blur but is actually induced by the stabilization system itself. The solution is simple: turn it off when tripod-mounted.
Comments
Loading comments...